Saturday, March 8, 2014

I hate edging afghans! *new pattern*


So, my husband came to me on 2/26 and said his cousin is having a baby shower, that he wanted me to make something unisex (they didn't want to know the sex of the baby), and he wanted it done so she can get it for her baby shower on 3/8. They live in Philly. I live in NC. 

Let's just say it didn't happen in his time frame. Especially since I didn't buy my yarn until March 1st...

But I did finish it! 


Now, onto that pesky edging...
I don't mind edging the top and bottom, because there are spaces there available for it. But once you get to the sides, what do you do?? It's so hard for me to find the perfect space on the side of the afghan to crochet into. I did it, be it ever so carefully.


This is my "Sunshine Stripes" afghan. 

I used the pattern from Suzie's Stuff blog (link provided) and her slant stitch scarf, but I made a couple of very small changes.

Materials:
2 skeins each Red Heart Super Saver Pale Yellow and White
K hook
Scissors

Abbreviations:
Ch - chain
dc - double crochet
hdc - half double crochet
sk - skip
sp - space
st - stitch
** - repeat the instructions in between the asterisks.

Ch 139
Row 1: (With color A) hdc first ch from hook to end. Ch 3, turn
Row 2: Sk next 2 hdc sp, *dc in next three hdc sp, dc in sk sp, sk next hdc sp*, repeat ** to next to last hdc sp, dc in last sp. With color B, ch 2, turn.
Row 3: hdc in each sp across to end. Ch 3, turn.

Repeat rows 2 and 3, alternating color on each hdc row, until desired length. Fasten off, weave in ends.

Edging:
I completed two rows of sc throughout, but be creative! As you read above, I'm not a fan of edging the sides of afghans, but there are some beautiful edging patterns out there.

Show me what you've done! I have a Facebook page - Leslie's Loops Yarn - and I want you to share photos of your crochet or knit projects.

Can't wait to see what you've done!

Monday, February 10, 2014

New location, New opening date, New skirt pattern!

Hello all!

So, remember that whole "Opening in Gastonia on 2/1/14"? Well, that didn't happen. I'm not even opening in Gastonia....
....BUT I am opening! In Charlotte!! April 19th!! Stay tuned for more info... I'm excited, mostly because right now my dining room is a yarn and furniture storage place...

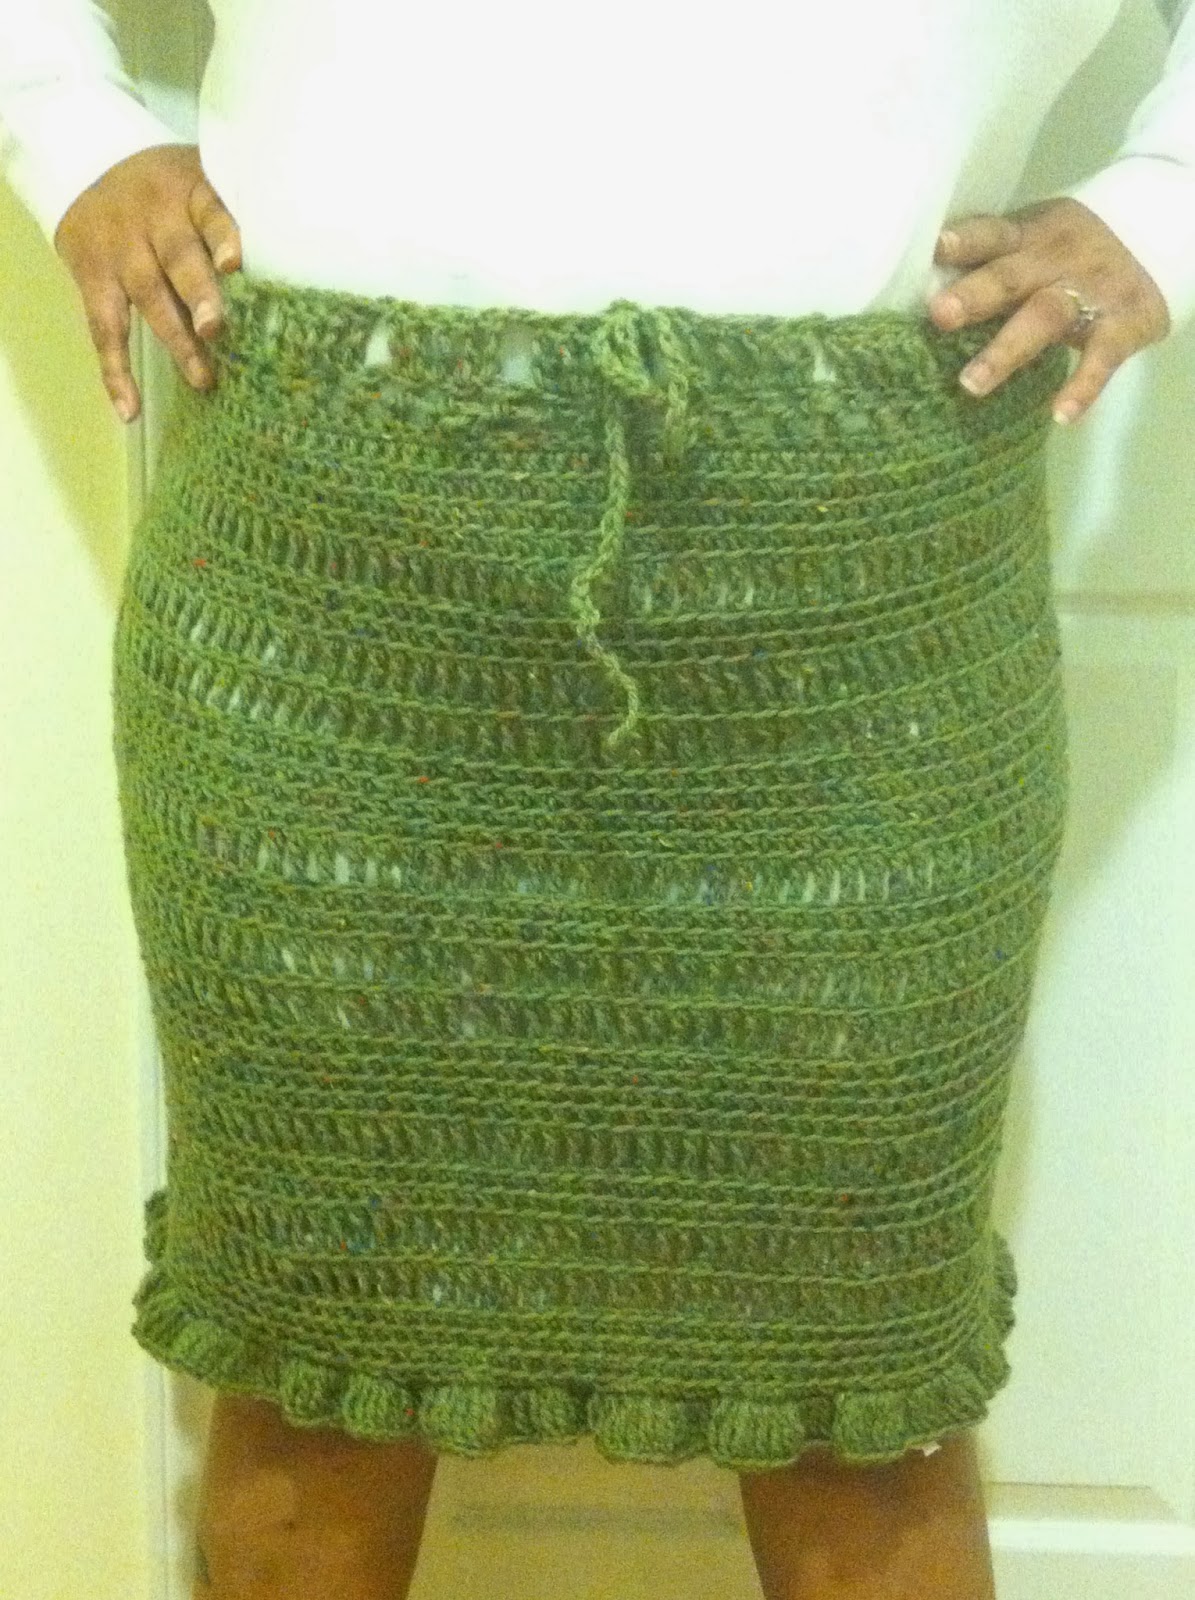
Anyway, back to my new pattern. I've never made a skirt before, and I wanted some new skirts for Sunday service.


This is the yarn I used. I purchased 10 skeins on eBay some time last year, and I thought it would make a nice skirt. I thought about using some of thousands of skeins of acrylic yarn I have, but I wanted to change it up a little. 

The pattern is rather easy - just like the last one. I started this on Saturday afternoon, and although I had to play chauffer with my children after service, I was still able to finish it today. I LOVE the fit and the color - I will definitely make this in other colors. 

So here's the pattern for the "4122" skirt. 
Now the size is done more by measuring the first chain around your waist, so I can't tell you how many skeins you will need to use. I will tell you that I'm a size 1X, and I used 6 complete skeins of yarn (I have not a scrap left over - and I like it that way). So, if you're smaller, you know you won't need more than 6 skeins. 


It's called "4122" because that's the way you work the rows to get the design you see. It's not an "in your face" type of design, but you can see it, and I think it gives the skirt a little character. 

4122 skirt
For 1X, you need:
6 skeins (620 yards) of Filatura Lanarota Wool Sprinkles yarn (or any worsted weight yarn)
J/10 6mm hook
Yarn needle
Scissors

Abbreviations (US terms):
blo - back loops only
ch - chain
hdc - half double crochet
sk - skip
sc - single crochet
slst - slip stitch
st - stitch
sp - space
trc - triple or treble crochet


Chain as many as will fit around your waist. For 1X, I chained 126. Measure the ch around your waist, increase or decrease ch as needed. 
Row 1: hdc in second chain from hook, hdc in each ch to end. Turn. 
Row 2: ch 2 (counts as first hdc), hdc in BLO in each hdc to end. Turn. 
Row 3-4: Repeat row 2. Turn. 
Row 5: ch 4 (counts as first trc), trc in blo in each st to end. Turn. 
Row 6-7: Repeat row 2. Turn. 
Row 8-9: repeat row 5. Turn. 
Repeat this pattern (rows 1-7) until desired length. My skirt is 32 rows. Skirt should end with four rows of hdc.
Fold skirt on wrong side and sew ends together using yarn needle. Fasten off. Weave in ends.

Ruffle bottom (optional):
Start where the ends were sewn together, ch 4. Three trc in each st to end. Sl st in top of ch 4 space. Fasten off, weave in ends. 

Waistband:
Start on other end where ends are sewn together, ch 2. Sc in each st to end. Slst in top of ch 2 space. 
Rd 2: ch 3, sk st, *hdc in blo of next st, ch1, sk st*, repeat ** to end. Slst in ch 2 sp of ch 3.  
Rd 3: ch 3, hdc in each ch 1 sp to end. Slst in ch 2 sp of ch 3. 
Rd 4: ch 4, trc in next 4 st, *ch 1, sk st, trc in next 5 st*, repeat ** to end. Slst in top of ch 4 sp. Fasten off, weave in ends. 

For the drawstring, ch 40 more than your original chain (the one for your waist). You can sc through the ch if you want, or leave it as is. Weave it through the ch 1 spaces of rd 4 in the waistband. 

You can also use a store bought belt or ribbon - your ch 1 spaces should be wide enough. 

That's it! 

Easy, right? 


Tuesday, January 14, 2014

Lovely baby bunny!!


So, do you all remember this cute picture? It's from my blog post on 1/26/2013 (click the date for the post).
Well, in the post, I talk about how I learned how to make the bunny ears, but never posted a pattern.

It's getting close to the holiday, and I know many people will be looking for some cute bunny ears, so here you are! You can attach these adorable oversized ears to any hat. I made a basic hat and used this newborn diaper cover.

Materials:
I used Caron Simply Soft yarn in grey
I/9 hook
yarn needle

Abbreviations:
ch = chain
dc = double crochet
dctog = double crochet together

Oversized Bunny Ears
Ch 7
Row 1: dc in 4th chain from the hook. Turn (5dc)
Row 2: Ch 3 (this will count as 1 dc throughout), dc in each dc. Turn (5dc)
Row 3: Ch 3, dc in same st, dc in next 3 dc, 2dc in last dc.  Turn (7dc)
Row 4: Ch 3, dc in each dc. Turn (7dc)
Row 5: Ch 3, dc in same st, dc in next 5dc, 2dc in last dc, Turn (9dc)
Row 6: Ch 3, dc in each dc. Turn (9dc)
Row 7: Ch 3, dc in same st, dc in next 7dc, 2dc in last dc, Turn (11dc)
Row 8-9: Repeat row 7. Turn. (13dc row 8, 15dc row 9)
Row 10 – 11: Ch 3, dc in each dc. Turn (15dc)
*Decrease*
Row 12: Ch 3, dctog in next two dc, dc in next 10dc, dctog in last 2dc. Turn (13dc)
Row 13: Ch 3, dctog in next two dc, dc in next 8dc, dctog in last 2dc. Turn (11dc)
Row 14: Ch 3, dctog in next two dc, dc in next 6dc, dctog in last 2dc. Turn (9dc)
Row 15: Ch 3, dctog in next two dc, dc in next 4dc, dctog in last 2dc. Turn (7dc)
Row 16: Ch 3, dctog in next two dc, dc in next 2dc, dctog in last 2dc. Turn (5dc)
Row 17: Ch 3, dctog in next two dc, dc in next dc, dc tog in last 2dc. (3dc)
Fasten off. Weave in ends.


Repeat for second ear. 

Sew the ears to the hat. 

Adorable!!

As you may have seen, I am opening a new store. I need funding. Please consider donating to my gofundme page. Share it with everyone you know!
Here's the link: Leslie's Loops Yarn Shop GoFundMe page

Thanks!

Until next time!


Sunday, January 12, 2014

BIG changes and a new pattern!

First, yes - I haven't been here in a LONG while! It took much longer than I expected to recover from my shoulder surgery. I'm still not 100%, and that's what brings me to...

Second, yes - I changed the site name. If you didn't know I am opening a new yarn shop. *EDIT* I will update name and opening date soon! I hope you can join me for my grand opening, and I hope you follow me as I embark on this INCREDIBLE journey!
I am looking for funding. The funding source I had fell through... which sucks.
Please consider donating to my store and share with your friends!
Leslie's Loops GoFundMe page

Alright! Now that that's out of the way, time to share my VERY FIRST crochet pattern! I'm so excited! It's SUPER EASY - anyone learning to crochet should be able to use this pattern to create great items.

It's called the Chain One Shawlette and Slouch Beanie.
Tadaaa!! 

Like it? I LOVE it!! I'm so happy with what I've made... hope you're happy, too!

*I do ask that you give me credit for my pattern, and if you post it that you use my link and not post it as your own.*

Here's the pattern:


Materials
I used one skein Universal Yarn Uptown DK Colors Parfait for each project. Use more than one skein if you want a longer scarf/shawlette, or make the hat first – you will have about ½ skein left.
Size 15/N (9.00mm) hook
Size 9/I (5.5mm) hook
Stitch markers (optional)

Chain One Shawlette/Scarf
With N hook
Ch 111
Row 1: hdc 4th ch from hook *ch1, skip ch, hdc in next ch,*. Repeat ** to end, ending with hdc. Turn.
Row 2: ch3 (counts as hdc and ch1 throughout), hdc in next ch1 space, *ch1, hdc, ch1* in each ch1 space. Turn.
Row 3 – 23: Repeat row 2. Fasten off. Weave in ends.

Chain One Slouch beanie
With I hook
Magic circle (or ch3 and insert hook into first ch then slipstitch to make circle.
Rd 1: Chain 3 (counts as 1dc), work 11dc into circle. Slip stitch to top of ch3 to join.
Rd 2: Chain 3, dc in same st, 2 dc in each dc. Join.
Rd 3: Chain 3, dc in same st, *1 dc in next dc, 2dc in next dc*, repeat ** to end, join.
Rd 4: Chain 3, dc in same st, *dc in next 2 dc, 2dc in next dc*, repeat ** to end, join.
Rd 5: Chain 3, dc in same st, *dc in next 3 dc, 2dc in next dc*, repeat ** to end, join.
Rd 6: Chain 3, dc in same st, *dc in next 4 dc, 2dc in next dc*, repeat ** to end, join.
Rd 7: Chain 3, dc in same st, *dc in next 8 dc, 2dv in next dc*, repeat ** to end, join.
Rd 8: Chain 3, hdc in next dc, *ch1, skip ch, hdc in next ch,*, repeat ** to end, join.
Rd 9: Chain 3, hdc in next ch1 space, *ch1, hdc, ch1* in each ch1 space to end, join.
Rd 10 – 22: Repeat Rd 9.
Rd 23: Chain 3, hdc in each hdc and chain space, join.
Rd 24: Sc in each hdc, join.
Rd 25 – 28: repeat Rd 24. Join. Fasten off and weave in ends. 


Easy, right? Let me know how it goes for you.

Bye for now!!

Sunday, May 12, 2013

Still on crochet hiatus...

Still healing. I didn't realize it was going to take this long. I'm even going through a little bit of a setback.

As soon as I can crochet again, I'll make sure to let you all know.

Until next time.

Leslie

Sunday, March 24, 2013

Still on the mend...

I still can't crochet, and I'm pretty bummed out about it. It's been almost three weeks since the surgery, and for some reason I thought I would be able to do more by now.

Guess I shouldn't rush it.

Anyway, I DID get new business cards! I love them! Easy Vistaprint cards - they were having a sale, so I snatched these up quickly! 

Do you like my design? 

Anyway, when I get back to work, I'll make sure I post my new creations! 

That's all for now!

Until next time!

Thursday, February 28, 2013

So, about my afghan giveaway tomorrow...

I know this scan doesn't make sense to most, but I'm going to try to explain it. 
My rotator cuff is being squished by a bone spur. There's a bony growth on my collarbone as well (not pictured). It hurts. I've been in pain for almost 2 months with nothing available to relieve it. I've taken plenty of meds... nothing works. So I'm having surgery on Tuesday. 
Because of this, I have to postpone the giveaway until May 1st. 

But don't worry about The Beauty In It Love My Fans contest (click for contest post) - because that will be over Saturday, I know I can have the scarf completed by Monday. I just can't make an afghan that fast... 

This also means I'll be out of commission for a while. Not too long, but there will be no posts from me - Facebook or blogging... 

As soon as I heal, I'll be back in full force - so watch out!!

I'll leave you with the last set I made - 
Leslie's Crochet Creations

I used the same patterns as the last set -Done in a Jiffy Blanket and Cardigan Sweater for babies. I just added hdc stripes to the sweater and hat. 

I hope you stick around for my next giveaway, and pray for me as I go through this surgery. 

Thanks!!

Until next time!